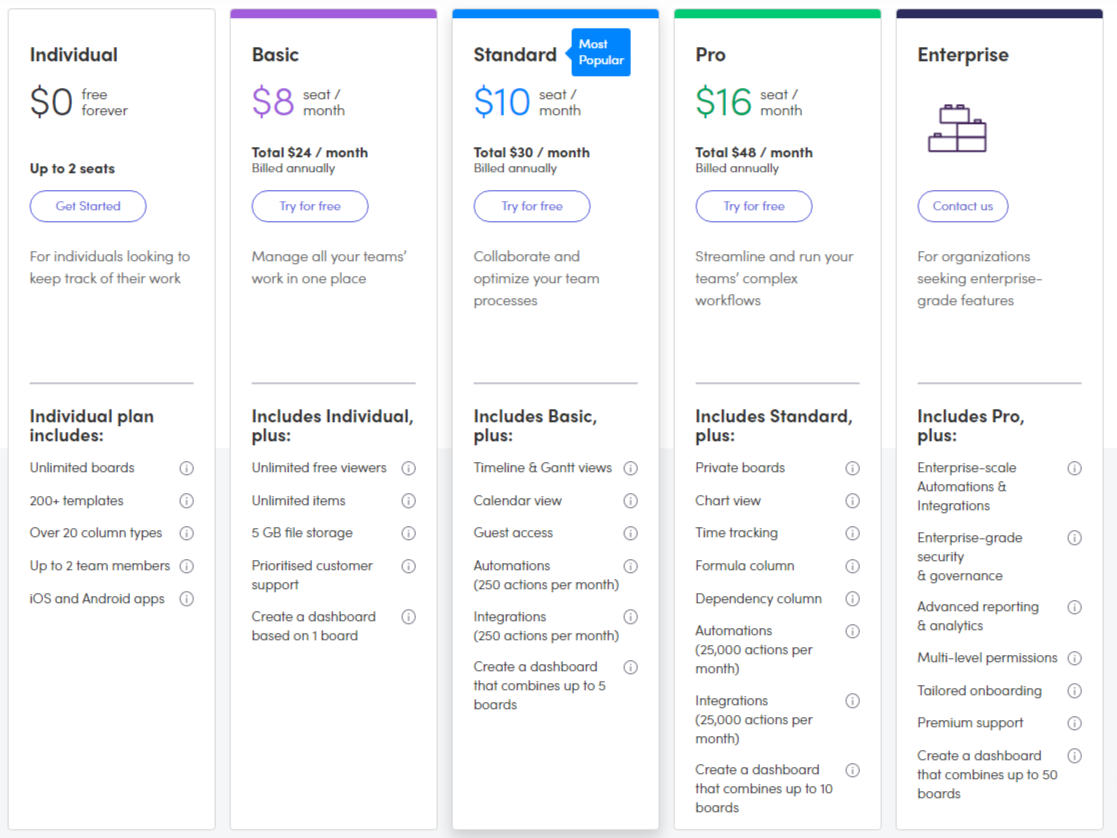
This Monday pricing section is effective for several reasons:
1. Clear Hierarchy and Visual Appeal:
- Distinct Tiers: The “Individual,” “Basic,” “Standard,” “Pro,” and “Enterprise” tiers are clearly labeled and visually separated with distinct colors.
- “Most Popular” Label: The “Standard” tier is highlighted as “Most Popular,” guiding user choice.
- Consistent Layout: Each tier follows a consistent layout with pricing, descriptions, features, and call-to-action buttons.
- Visual Cues: Icons are used to represent features, enhancing visual appeal and understanding.
- Clear Headings: The headings clearly indicate the purpose and target audience of each tier.
- Pricing Clarity: The monthly prices are prominently displayed, with both per-seat and total monthly costs shown for some tiers.
- Call to Action Buttons: The “Get Started,” “Try for free,” and “Contact us” buttons are visually distinct and clearly labeled.
2. Value-Based Differentiation:
- Targeted Descriptions: Each tier has a concise description that clearly identifies the target customer and their needs.
- Feature Progression: The “Includes [Previous Tier], plus…” structure clearly highlights the added value of higher tiers.
- Specific Feature Differentiation: Features like “Timeline & Gantt views,” “Private boards,” “Enterprise-scale Automations & Integrations,” and “Enterprise-grade security & governance” differentiate the higher tiers.
- Quantitative Differentiation: The differences in seat limits, file storage, automation actions, and dashboard capabilities provide clear quantitative differences.
- Free Option: The “Individual” tier offers a free option, lowering the barrier to entry.
- Free Trial: The Free trial option on the Basic, Standard and Pro tiers are present.
3. Transparent Pricing:
- Clear Pricing Information: The monthly prices are clearly stated for each tier, with both per-seat and total monthly costs shown for some tiers.
- Contact for Pricing: The “Enterprise” tier uses “Contact us,” indicating a tailored solution for larger clients.
- Billed Annually: The “Billed annually” information is clearly stated for relevant tiers.
4. Addressing Different User Needs:
- Individuals: The “Individual” tier caters to individuals with basic needs.
- Small Teams: The “Basic” and “Standard” tiers are designed for small teams with varying needs.
- Larger Teams/Businesses: The “Pro” tier caters to larger teams and businesses needing more advanced features.
- Enterprises: The “Enterprise” tier caters to organizations needing enterprise-grade features and security.
5. Strategic Use of Information:
- Benefit-Oriented Features: Features like “Unlimited boards,” “Timeline & Gantt views,” and “Enterprise-grade security & governance” highlight the value of each tier.
- Clear Call to Action: The call-to-action buttons provide clear paths for action.
- Feature Lists: The feature lists clearly show the differences between the tiers.
- Concise Descriptions: The descriptions are brief and to the point, making it easy to understand the purpose of each tier.
- “Most Popular” Highlight: The “Most Popular” label on the “Standard” tier influences user choice.