
ProcessMaker
Award winning, enterprise grade, low-code intelligent business process management software & workflow automation platform.
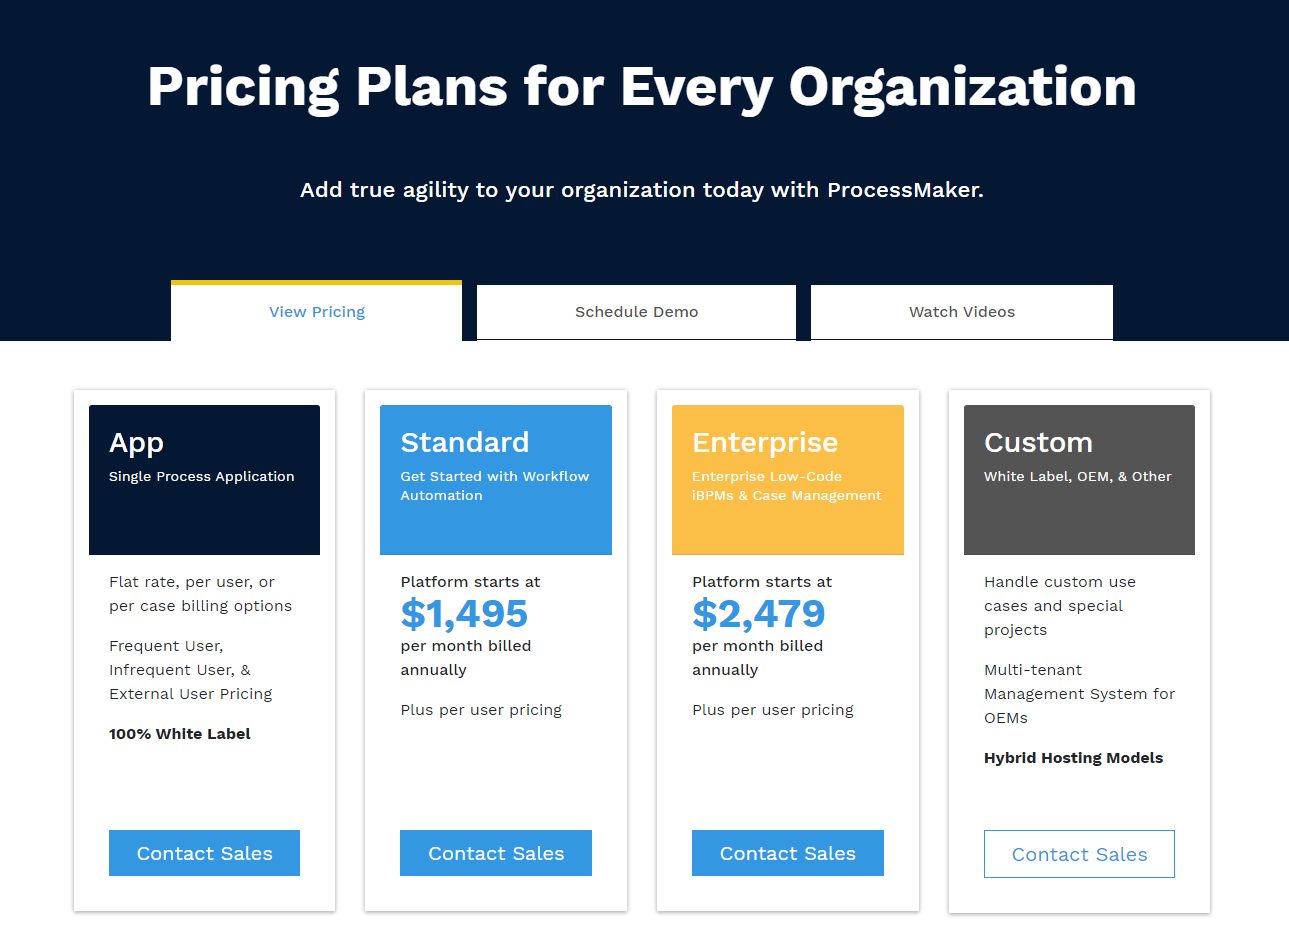
ProcessMaker Pricing Page Design
$500+ 4 Plans
Launch Website
Business rules & RPA integration.
The ProcessMaker pricing section is well-designed and effective for several reasons:
1. Clear Hierarchy and Visual Appeal:
- Headline Focus: “Pricing Plans for Every Organization” clearly states the target audience.
- Tiered Structure: “App,” “Standard,” “Enterprise,” and “Custom” offer distinct options.
- Concise Descriptions: Each tier has a brief, descriptive label.
- Call to Action Buttons: Prominent “Contact Sales” buttons encourage engagement.
- Additional Navigation: “View Pricing,” “Schedule Demo,” and “Watch Videos” provide further exploration options.
2. Value-Based Differentiation:
- Targeted Messaging: Each tier caters to specific needs (single app, workflow automation, enterprise solutions, custom projects).
- Feature Hints: Descriptions offer glimpses into the functionality of each tier.
- Implied Progression: The tiers suggest a progression of features and capabilities.
3. Transparent Pricing (with Caveats):
- Starting Prices: “Standard” and “Enterprise” list starting prices, giving a cost baseline.
- Annual Billing: “Per month billed annually” clarifies the commitment.
- Vague “App” Pricing: “Flat rate, per user, or per case billing” is unclear and lacks transparency.
- “Custom” Pricing: No pricing information is provided for the “Custom” tier.
4. Addressing Different User Needs:
- Small Projects: The “App” tier seems geared towards smaller, specific needs.
- Growing Businesses: The “Standard” tier likely targets businesses scaling their operations.
- Large Enterprises: The “Enterprise” tier caters to organizations with complex workflow requirements.
- Unique Requirements: The “Custom” tier addresses organizations with highly specific needs.
5. Strategic Use of Information:
- White Label Option: Mentioning “100% White Label” for the “App” tier is a specific selling point.
- “Plus per user pricing”: This phrase under Standard and Enterprise is unclear and needs clarification.
- Hybrid Hosting Models: Mentioning this for the “Custom” tier hints at flexibility.